How to Improve Audio Recording for Video Before Editing
Good audio recording for video starts before you open your editing software. This guide helps you to diagnose poor audio quality, control noise, place your microphone properly, check wireless reliability, and decide what to fix during recording, not later.
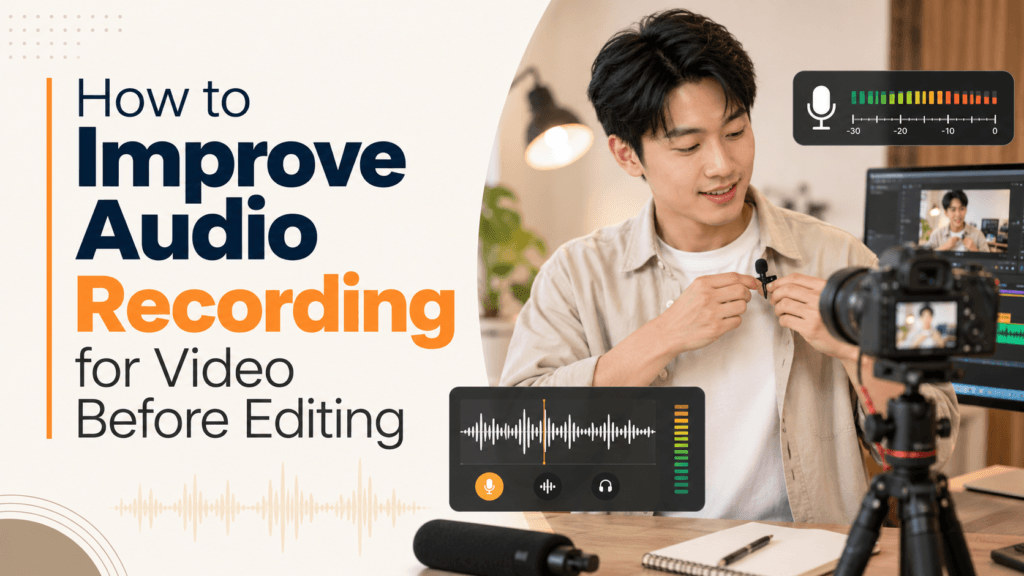
Quick Answer: How to Improve Audio Before Editing
To improve audio recording for video, fix the recording source first. Listen to a short test and check the problem in this order:
- Environment — Is there wind, echo, air-conditioning, traffic, or crowd noise?
- Mic position — Is the microphone close enough and placed correctly?
- Connection — Is a wireless system actually recording without dropouts?
- Battery — Can the microphone last through the important take?
- Recording level — Is the voice clean without heavy distortion or clipping?
- Mic suitability — Does the microphone fit the way the subject is moving and recording?
- Post-production — Only clean up what could not reasonably be controlled during recording.
A better microphone can help, but sound quality alone is not enough.
For interviews, events, and special moments, reliability is crucial.
It’s often more important than a small increase in sound quality.
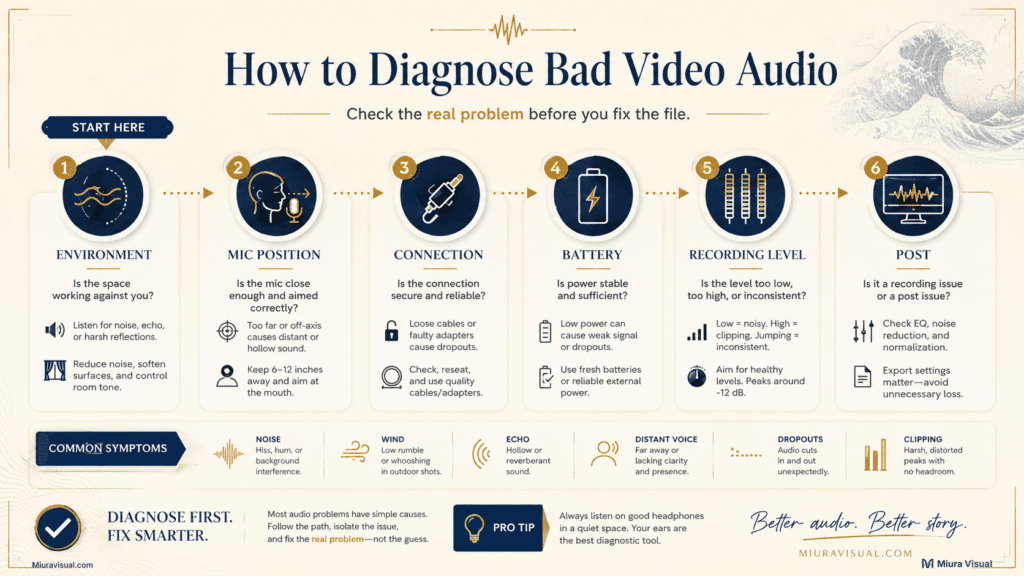
Diagnose Why Your Video Audio Quality Sounds Poor
Do not start by adding noise reduction or buying another microphone. First identify what is actually wrong with the recording.
Use this as a practical diagnosis guide:
| What You Hear | Check First | First Move |
|---|---|---|
| Voice sounds distant or thin | Mic distance | Move the microphone closer |
| Room sounds hollow or echoey | Recording environment | Change position or reduce reflections |
| Constant fan, air-con, or traffic noise | Noise source | Remove or reduce the source if possible |
| Strong wind rumble | Wind protection | Add proper wind protection or reposition |
| Voice sounds harsh or distorted | Recording level | Reduce the input level and test again |
| Random silence or dropouts | Wireless connection | Stop and verify the connection |
| Clothing or rubbing noise | Mic placement | Reposition the lavalier |
| Battery drops quickly | Power | Recharge or replace before an important take |
| Sound is fine sometimes but missing later | Monitoring and connection | Check the recorded file, not only the transmitter |
The order matters because one problem can easily be mistaken for another.
For example, a distant microphone may capture more room sound.
Adding noise reduction later does not fix the distance problem.
It’s better to move the microphone closer before recording.
The same principle applies to wireless dropouts.
Audio enhancement can‘t fix parts that were never recorded correctly.
👉 For planning, filming, editing, and delivery, follow a complete video production workflow. This way, you won’t turn one audio issue into a lengthy checklist.
Control Background and Wind Noise Before Recording
Background noise is easier to control before it reaches the microphone.
Before recording, listen to the location without speaking. Pay attention to sounds you may have stopped noticing:
- Air-conditioning
- Fans
- Traffic
- People talking nearby
- Music from another room
- Electrical hum
- Doors opening and closing
- Event announcements
- Wind hitting the microphone
You do not need a perfectly silent room.
You need a recording space where your voice stands out above any noise.
Reduce Background Noise at the Source
If one side of a room is loud, moving your recording spot can help more than trying to fix the noise later.
The same applies to echo.
Bringing the microphone closer to the speaker captures less of the room.
Softer surroundings can also help when you are recording in a reflective room.
For a controlled voice-over, you can often pause and change the setting more easily.
An event interview is different.
Once the person leaves, that recording opportunity may be gone.
That difference should affect how strict your audio check is.
Use proper wind protection outdoors
Outdoor recording faces a challenge.
Wind can hit the microphone and create a low-frequency rumble.
A basic foam cover offers light protection.
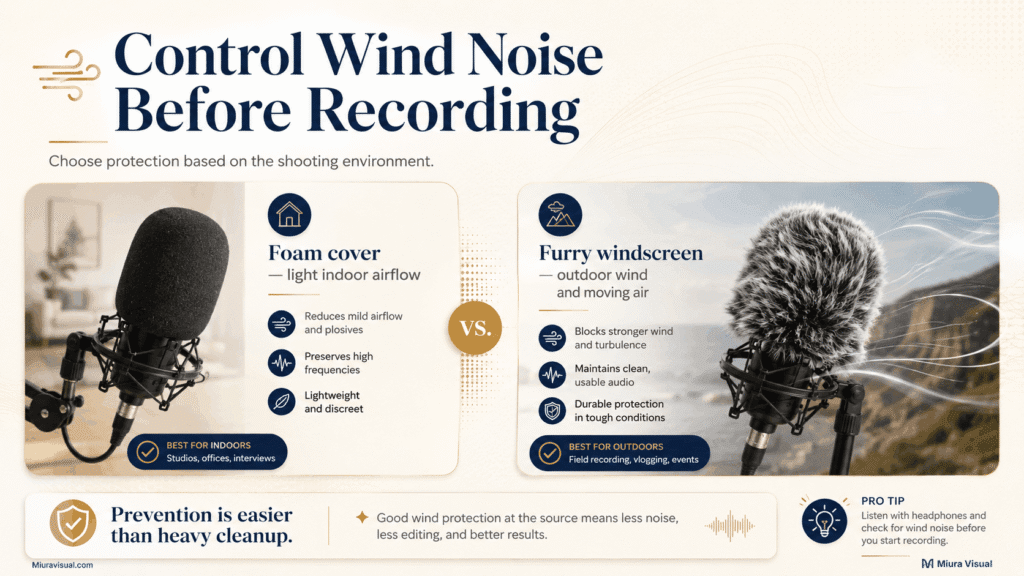
However, when the wind picks up, we choose a furry windscreen over the standard black foam cover.
This has been a practical consideration in our outdoor and event recording work.
Blocking wind from the microphone is more helpful.
It’s better than relying on audio cleanup to fix the recording later.
Do not treat the furry cover as a cosmetic accessory.
If you often record interviews, events, cosplay, or outdoor videos, make it a regular part of your setup.
Don’t wait for windy days to use it.
Common mistake: waiting until the edit to discover that the wind noise covers parts of the dialogue.
The best habit is simple: record a quick sample outside.
Listen to it, then add or adjust wind protection before the final take.
Position the Microphone for the Shot
An external microphone does not automatically produce clean audio. Distance and placement still matter.
A microphone that’s too far from the speaker picks up more background noise along with the voice.
Moving it closer can often enhance the voice-to-room balance.
This can happen without any software changes.
For a lavalier microphone, start by checking three things:
- Is it close enough to the speaker’s mouth?
- Can clothing, jewellery, hair, or movement rub against it?
- Will the subject move enough to change the microphone position during the take?
Do not hide the microphone so aggressively that you create a new problem.
A hidden lavalier that rubs against clothes is worse than a visible mic with clear sound.
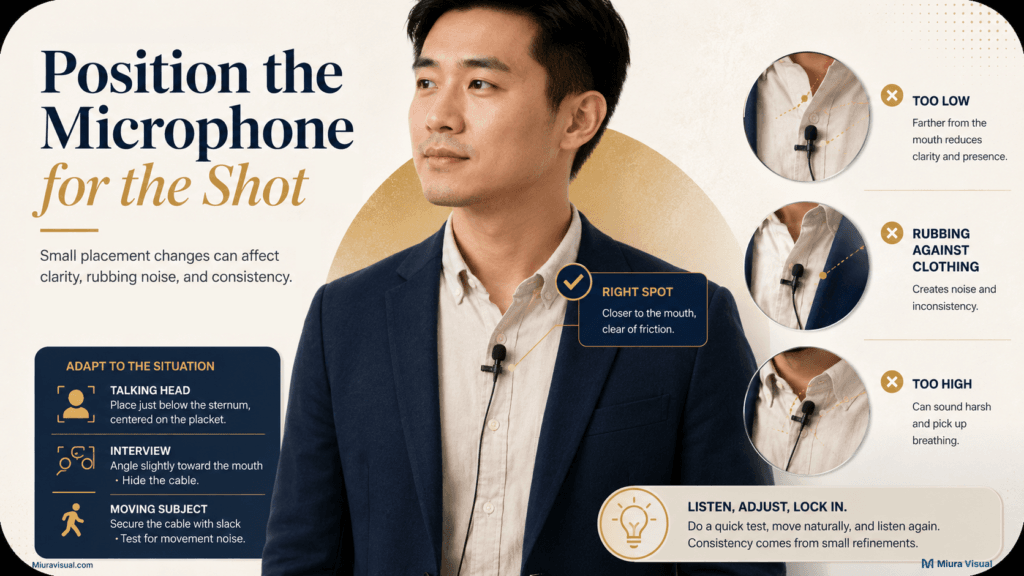
Match the placement to the actual video
For a seated talking-head video, you have more control.
You can position the microphone, record a test, and make small adjustments.
For an event interview, the situation moves faster.
The subject may turn, walk, gesture, or leave immediately after the conversation.
Reliable placement becomes more important than making the microphone invisible.
For product videos, pick the sound source.
Is it from a presenter, a voice-over, product action, or a mix?
The microphone should support the sound the final video actually needs.
Do not choose a placement because it looks professional behind the scenes.
Choose it because the recorded voice remains usable.
Check Connection and Battery Before You Trust the Recording
One big lesson from using wireless microphone systems is that good sound is only half the job.
The microphone has to work well, too.
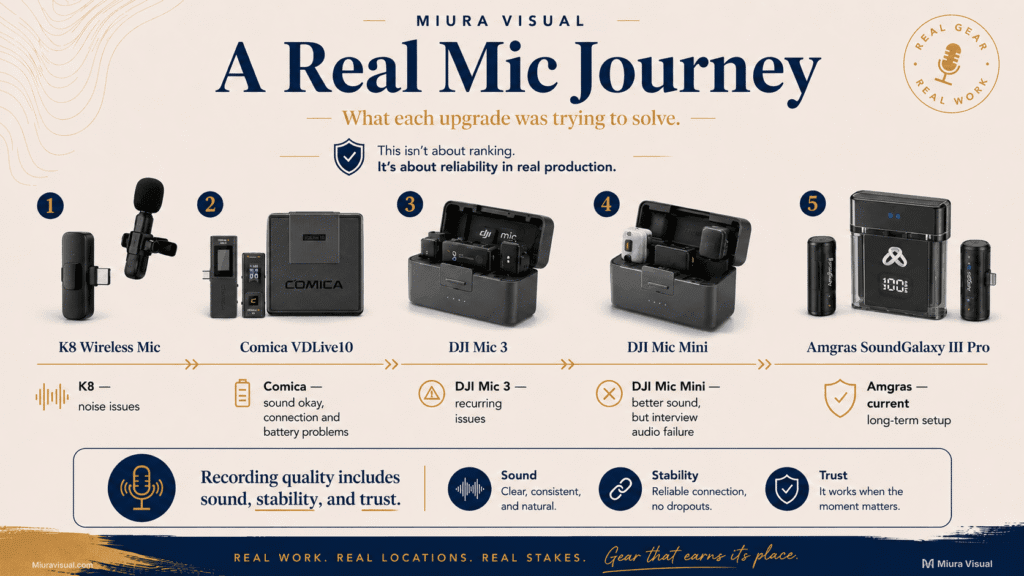
We started with an inexpensive K8 wireless lavalier microphone.
Back then, we didn’t focus much on audio.
An affordable external mic felt like a good choice.
It was not.
The recording contained enough noise that upgrading became necessary.
We later moved to a Comica VDLive10.
The sound worked for us, but the overall production experience created a different problem: connection problems and battery drain.
A charging case can recharge a wireless system between recordings.
That feature isn’t very helpful during interviews.
You can’t ask everyone to pause while the microphone charges.
The same lesson became much more serious with later wireless systems.
We also used DJI wireless microphones, including the DJI Mic 3 and DJI Mic Mini.
The Mic Mini gave better sound than some of our earlier cheap gear.
However, we still faced connection issues.
During one event interview, the failure was not merely noisy audio.
The interview had no usable audio track.
That is a very different production problem.
You can sometimes clean up noise.
The wireless microphone failed during the interview.
So, you can’t ask for the event to happen again.
We eventually moved to the Amgras SoundGalaxy III Pro.
We’ve used that system for over three years.
It has not given us the connection problems we had with earlier wireless systems.
This is based on our experience with those specific units.
It is not a controlled lab comparison, nor a claim that all units from those brands act the same.
The production lesson is broader than the individual models.
Judge a microphone on more than sound quality
When we check a wireless microphone for real recording, these factors matter:
- Sound quality — Is the voice clean enough for the final video?
- Connection reliability — Can the system maintain a stable signal?
- Battery life — Can it finish the session without creating interruptions?
- Wind handling — Can the setup cope with the recording environment?
- Usability — Can you set it up quickly when working alone or with a small team?
- Recording confidence — Can you trust that the important take was actually captured?
A microphone that sounds better but has random dropouts may not be a good choice.
This is especially true for an interview that can’t be repeated.
In a controlled voice-over session, that trade-off matters less.
You can pause and re-record the line if needed.
Decision rule:
The harder a recording is to repeat, the more you should focus on reliability.
Small differences in sound quality matter less.
Set Audio Levels Before the Real Take
After managing the environment, microphone position, and connection, check the recording level.
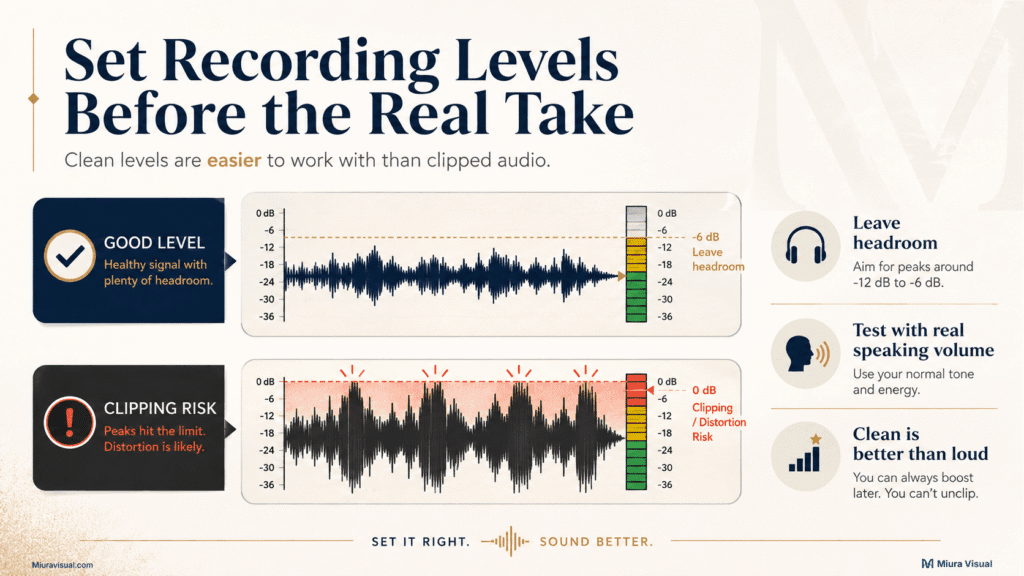
The goal is not to make the waveform look as large as possible.
The goal is to record clear audio without pushing loud moments into heavy distortion.
Ask the speaker to talk at the volume they will actually use during the take.
Do not test with a quiet sentence if the interview will become energetic later.
Listen for:
- Sudden distortion on louder words
- Voice that is unnecessarily quiet
- Large changes when the person turns their head
- Background noise becoming too prominent
- Unexpected wireless interference
- One transmitter behaving differently from another
A slightly conservative level gives you more room for an unexpectedly loud word.
Severe clipping is harder to fix than just cleaning up a good recording later.
Don’t fix a low recording level by moving the microphone far away and cranking up the input too much.
That can also raise unwanted room and background sound.
Check the source first, then the level.
Choose the Microphone for the Recording Situation
There is no need to turn every shoot into a microphone comparison.
The better question is:
What can go wrong in this recording, and which setup gives me the best chance of capturing it properly?
For a controlled talking-head video, you can prioritise clean voice quality and repeatability.
For a moving interview or event, think about these key points:
- Connection
- Battery life
- Subject movement
- Setup time
- Ability to monitor the recording
These factors will help ensure a smooth experience.
For an outdoor shoot, wind protection becomes part of the decision.
For voice-over work, wireless freedom isn’t helpful if the speaker stays in one spot.
Buying a more expensive microphone isn’t always the best first step for every audio issue.
Our own microphone upgrades solved different problems at different stages.
The inexpensive K8 exposed the limitations of very low-cost audio.
Switching to branded equipment helped a bit.
But connection and battery issues became bigger problems.
This happened when we used the microphones in real production.
Do not upgrade until you know what you are trying to fix.
If the problem is wind, buy or use better wind protection.
If the problem is placement, reposition the mic.
If your wireless link is unreliable during interviews, choose a trustworthy system.
Also, ensure you have a stronger recording check.
Mic choice should come after diagnosis, not before it.
Use a Practical Audio Recording for Video Check Before You Start
We do not use a rigid professional audio checklist for every shoot.
Different jobs move at different speeds.
However, a short pre-recording check is worth adding when the recording matters.
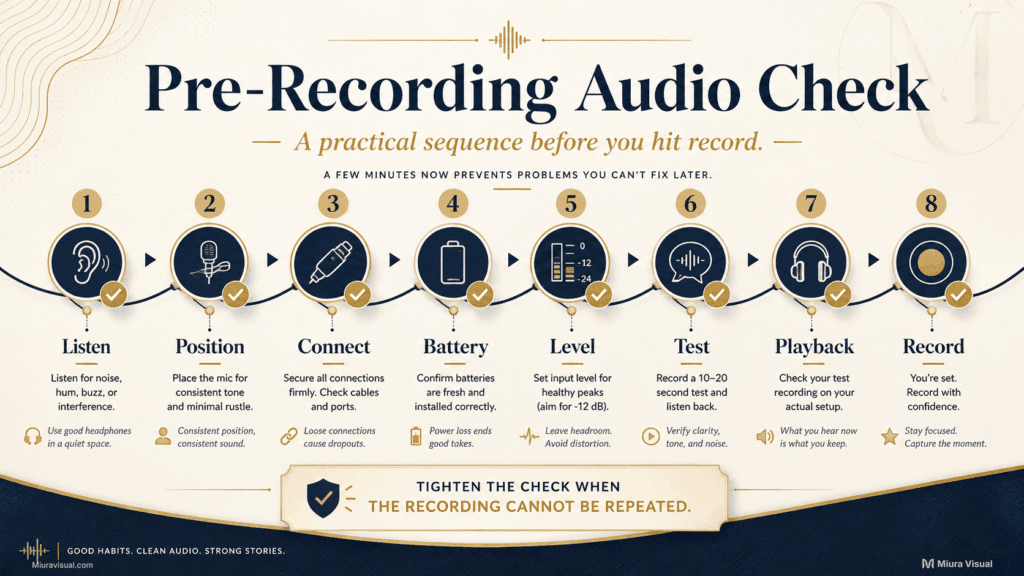
A practical sequence is:
- Listen to the location. Identify obvious noise, wind, echo, or interference.
- Position the microphone. Keep it close enough without creating rubbing or handling noise.
- Check the wireless connection. Confirm the transmitter and receiver are actually communicating.
- Check battery status. Do not begin an important interview with marginal battery life.
- Set the recording level. Ask for a realistic speaking volume.
- Record a short test. Ten or twenty seconds is enough to reveal many problems.
- Play the file back. Confirm that the sound was actually recorded.
- Start the real take.
The seventh step is easy to skip.
A connected transmitter doesn’t show what the recorded file sounds like.
A short playback can catch problems before they become permanent.
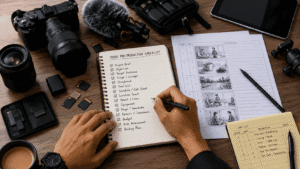
For shoots with more moving parts, use a broader video pre-production checklist.
Check the script. Review the location.
Make sure your gear is ready. Set up lighting and audio.
Go over the schedule and your backup plan before filming.
When can you shorten the check?
A quick social video filmed solo in a controlled room doesn’t require as much prep as a paid event interview.
You can keep the check lighter when:
- The recording can easily be repeated
- The room is controlled
- The setup is already familiar
- The subject is not waiting
- Losing one take has little consequence
Be stricter when:
- The interviewee is only available once
- The event cannot be recreated
- You are using wireless audio
- The location is noisy or outdoors
- Several people are being recorded
- Missing audio would make the footage unusable
The purpose is not to add production bureaucracy.
It is to match the amount of checking to the cost of failure.
What Bad Audio Can You Fix in Post-Production?
Post-production is helpful, but it shouldn’t be the first defense against poor recording.
Some problems are reasonable to improve after filming:
- Small differences in level
- Minor background noise
- Basic voice cleanup
- Small tonal inconsistencies
- Balancing dialogue against music
Other problems may only be partly recoverable:
- Noticeable room echo
- Strong continuous background noise
- Wind rumble overlapping speech
- Inconsistent microphone position
- Short wireless interruptions
Then there are failures where re-recording may be the more realistic option:
- Large sections with no recorded audio
- Severe wireless dropouts
- Dialogue buried under another loud sound
- Heavily distorted or clipped speech
- A microphone that never captured the intended speaker clearly
This distinction is important.
Modern audio enhancement tools can make bad recordings sound great in demos.
They cannot guarantee that every damaged recording becomes clean, natural dialogue.
Use editing to refine usable audio, not as permission to ignore capture problems.
Once the recording is secure, the video editing workflow starts.
It covers audio editing, subtitles, color, review, and export.
Keep your audio files organized with the matching footage.
Don’t scatter them across different devices and folders.
A clear system for organizing photos and videos makes it easy to find audio.
You can locate it quickly when editing begins.
Conclusion
If your current audio sounds poor, do not buy another microphone first.
Identify the real issue: is it the environment, wind, placement, wireless connection, battery, or recording level? Then, fix that part.
Creators recording controlled videos can afford to test and repeat.
Interview, event, and one-time production work require a higher standard.
A missed recording might not get a second chance.
The next step is easy: before your important shoot, record a short sample.
Then, play the actual file back.
If the voice is clean and the system is stable, continue.
If something sounds wrong, fix it before the real recording starts.
Frequently Asked Questions
Do I need an external microphone for video?
Not always. If the camera or phone is close and the environment is controlled, the built-in microphone can work for simple content. An external microphone is helpful when you want to capture voices clearly. It works well for recording from a distance or controlling background noise.
How close should a microphone be when recording video?
There is no single distance that works for every microphone and shot. Hold the microphone close to get a clear voice. Avoid clothing and handling noise. Check the setup with a test recording.
Should I record the room tone for the video?
Yes, when the edit may need clean ambience between dialogue cuts. Room tone is a brief recording of a space with no speech. It helps editors keep a natural background sound between edits.
Can You Fix Bad Audio After Recording?
No. Minor noise, level differences, and some tonal problems can often be improved. Missing audio, severe dropouts, and heavy distortion are big problems. Loud sounds can cover dialogue, making it hard to fix. Sometimes, it’s impossible to recover clean sound.

Miura Visual
Transforming visuals into content, stories, and scalable value across platforms and audiences.
Related Article