How to Storyboard a Video for Short-Form Brand Content
This guide shows you how to storyboard a video from an approved script and decide whether your project needs one. You’ll learn what each panel needs and how to convert the approved board into a practical shot list.

Quick Answer: How to Storyboard a Video
Use a storyboard when the video depends on a planned visual sequence, strict timing, product actions, transitions, several production setups, team coordination, or client approval.
A casual vlog, talking-head video, or quick phone clip is usually fine.
Just have an outline and a simple shot list ready.
Follow these steps to learn how to storyboard a video:
- Confirm the goal, platform, duration, and script.
- Mark the important visual changes in the script.
- Create one panel for each meaningful visual beat.
- Add timing, action, framing, audio, and on-screen text.
- Review the sequence with the team or client.
- Convert the approved storyboard into a shoot-ready shot list.
The storyboard should remove uncertainty from the production process.
It should not become a separate illustration project that delays the shoot.
Do You Need a Storyboard or Only a Shot List?
The type of video and production risk matter more than whether you are using a phone or professional camera.
A solo creator filming on a phone may still need a storyboard when a product must appear in a precise sequence.
A bigger team at an unpredictable event often depends on a run sheet and shot list.
This is because they can’t plan the exact scenes ahead of time.
Use these five questions:
- Does the video rely on a specific visual sequence?
- Would missing a scene cause an expensive or difficult reshoot?
- Does a client or team need to approve the visual direction?
- Are timing, transitions, or product actions important?
- Are multiple people, locations, or setups involved?
| Your Answers | Recommended Planning Document |
|---|---|
| 0–1 yes | Outline or shot list |
| 2–3 yes | Simple storyboard |
| 4–5 yes | Detailed storyboard with formal approval |
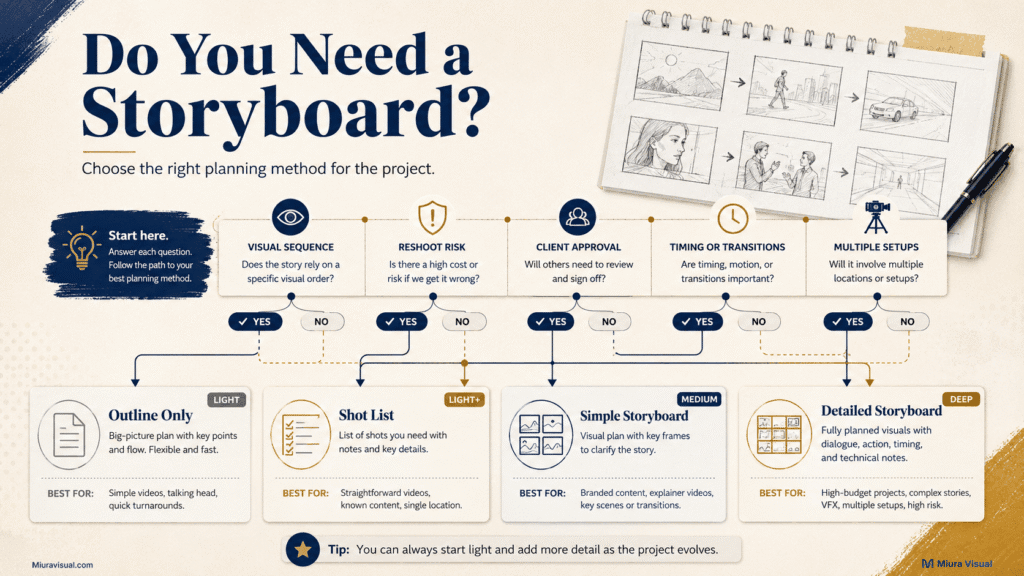
This is a practical planning rule rather than an industry standard.
Its purpose is to stop small teams from overplanning simple content and underplanning expensive work.
A simple talking-head Reel normally needs:
- A clear hook
- Three main points
- A closing action
- A short list of supporting shots
A product commercial typically requires a storyboard.
This outlines movements, close-ups, and text overlays.
A client approval stage usually requires a storyboard.
If you just need to organize individual shots for filming, use a practical shot list.
There’s no need to create a full storyboard
Lock the Brief and Script Before Drawing
Do not build a storyboard around an unstable idea.
Before creating panels, confirm:
- Video goal
- Target audience
- Main platform
- Final duration
- Core message
- Call to action
- Mandatory brand or product details
- Approved script or scene outline
- Known production limitations
The script does not need to include every word when the video is mainly visual.
However, the message and order should stay stable.
This way, we won’t need to rebuild the storyboard after each discussion.
Wait before storyboarding when:
- The client has not approved the concept
- The product claim is still changing
- The platform is unknown
- The video could be 15 seconds or two minutes
- The main call to action has not been decided
- The team has not confirmed what must appear on screen
A rough visual board can help explore an early concept.
It should not be treated as the final production plan.
Storyboarding is only one part of preparation.
Location, equipment, lighting, audio, talent, scheduling, and backup arrangements belong in a wider video pre-production checklist.
How to Turn a Script Into a Storyboard for a Video
A common mistake is making one storyboard panel for each sentence or edit.
That usually creates a heavy board that nobody wants to review.
Instead, create a new panel when there is a meaningful visual change.
A visual change is meaningful when:
- The viewer needs to see new evidence
- The subject begins a different action
- The location or time changes
- The camera angle or framing serves a different purpose
- A new product detail appears
- The on-screen message changes
- A planned transition needs preparation
- The call to action enters the scene
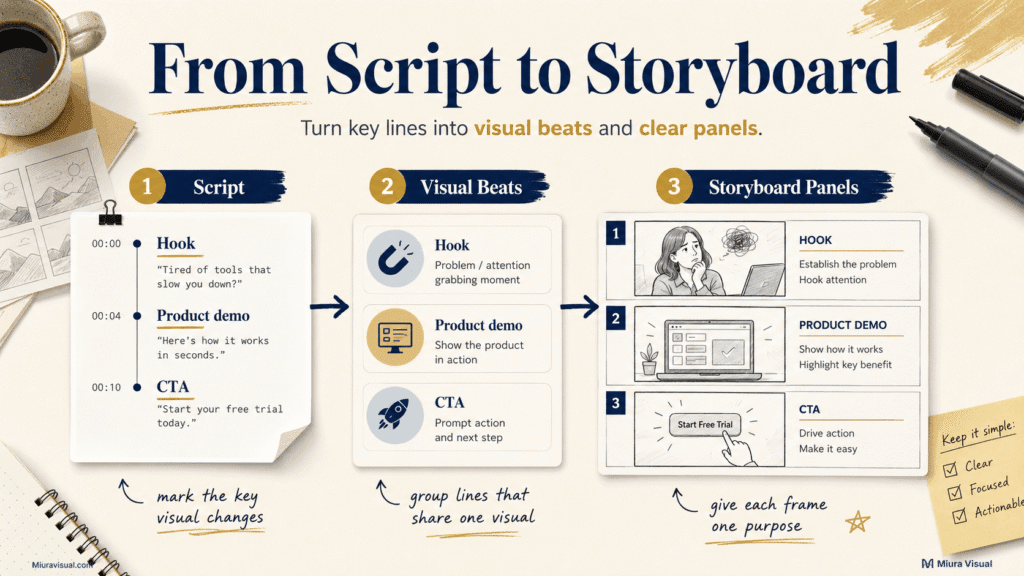
Step 1: Mark the Hook
Identify what viewers should see during the opening seconds.
For a product video, the hook may be:
- The final result
- A common problem
- A dramatic comparison
- A clear product action
- A visual transformation
Don’t start with a logo animation unless your brand is already well-known.
Step 2: Highlight What Must Be Seen
Some parts of a script can be communicated through voice-over.
Other parts require visible proof.
Example script: This compact light makes a small desk setup brighter without taking over the workspace.
The viewer may need to see:
- The dark desk before the light is switched on
- The product size beside common desk items
- The light turning on
- The improved workspace
- A close-up of the controls
Those are potential visual beats.
Step 3: Group Lines That Can Share One Visual
Several sentences may use the same scene.
Do not create a new panel simply because the voice-over moves to another sentence.
Create a new panel only when the viewer needs different information.
Step 4: Give Every Frame One Purpose
Examples of frame purposes:
- Stop the scroll
- Show the problem
- Introduce the product
- Demonstrate the main benefit
- Prove the result
- Show the next action
If a panel has no clear purpose, remove or combine it.
Step 5: Check Whether the Sequence Can Be Filmed
A storyboard may look logical on paper but still be unrealistic.
Check:
- Can the location support the framing?
- Can the product perform the action shown?
- Does the team have the required props and equipment?
- Can the transition be created safely?
- Is the total filming time realistic?
- Can the sequence fit the required duration?
This script-to-visual-beat process is more useful than drawing a detailed panel for every small cut.
Build a Minimum Viable Video Storyboard Template
A useful storyboard helps the team make the right decisions.
It should be simple to keep up with, too.
Each panel should include:
| Field | What It Controls |
|---|---|
| Panel number | Sequence reference |
| Duration | Pacing and total runtime |
| Frame purpose | Why the shot exists |
| Visual | What the viewer sees |
| Subject action | What happens in the frame |
| Framing or movement | Camera intention |
| Audio | Dialogue, voice-over, music, or sound |
| On-screen text | Caption, product claim, or CTA |
| Transition | How the next panel connects |
| Production note | Props, location, or limitations |
| Approval status | Whether the panel is confirmed |
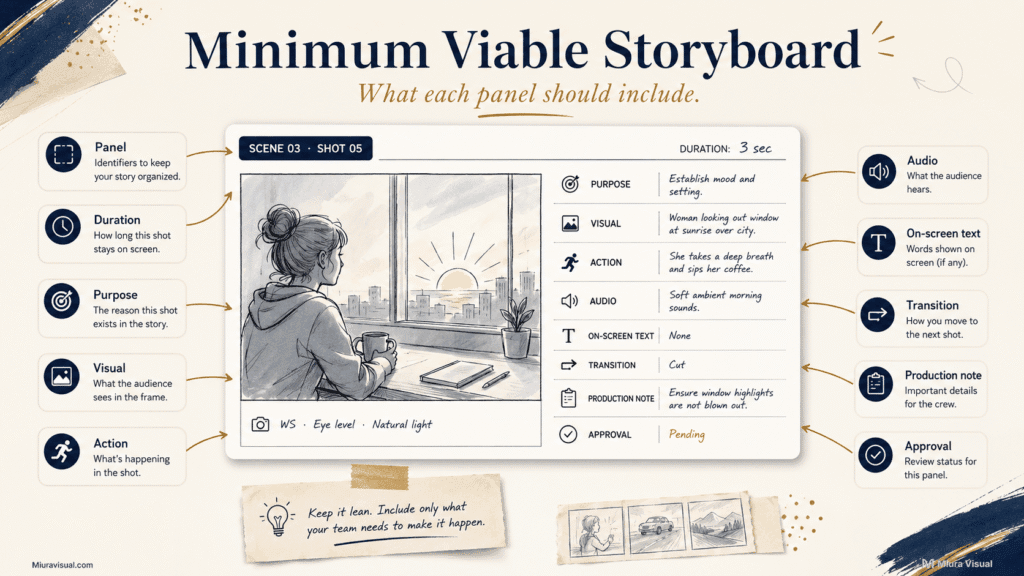
Minimum Storyboard Panel Example
Panel 03
- Duration: 2.5 seconds
- Purpose: Demonstrate the main product benefit
- Visual: Desk changes from dim to evenly lit
- Action: Creator switches on the light
- Framing: Medium side angle, slow push-in
- Audio: “Brighten your setup without losing desk space.”
- On-screen text: Compact, adjustable lighting
- Transition: Match cut from the dark setup
- Production note: Keep the product label facing camera
- Approval: Pending
You do not need professional drawing skills to create storyboards.
Use:
- Stick figures
- Rough sketches
- Reference photos
- Screenshots
- Simple shapes
- AI-generated visual references
- Photos of the actual location
The panel only needs to communicate the visual intention clearly.
Avoid excessive detail when it does not affect production, timing, approval, or editing.
The storyboard is a working production document, not an illustration portfolio.
Choose the Right Level of Storyboard Detail
Not every project needs the same type of board.
| Storyboard Level | Best For | Include |
|---|---|---|
| Thumbnail board | Solo planning and simple scenes | Basic composition, action, and sequence |
| Production board | Small team and product videos | Timing, framing, movement, audio, and production notes |
| Client approval board | Commercials and brand campaigns | Brand details, product appearance, text, claims, CTA, and approval status |
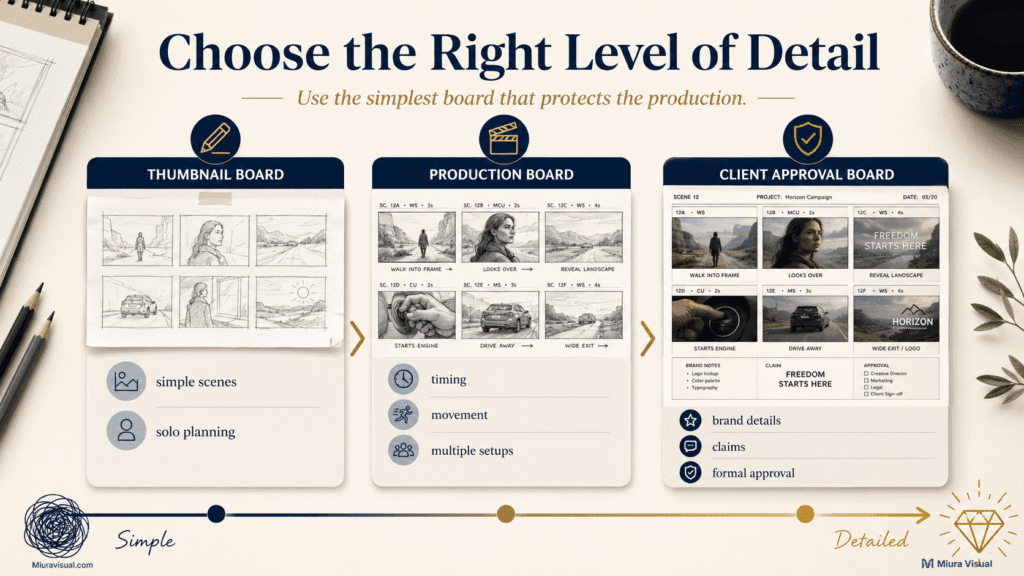
Use a Thumbnail Board When
- You understand the idea but need to check the sequence
- The video has only one creator
- The location and setup are simple
- The reshoot risk is low
- Nobody outside the production team needs to approve it
Use a Production Board When
- Several shots depend on each other
- Product actions must happen in a certain order
- The editor needs a clear intended sequence
- Multiple setups must be coordinated
- Timing affects the message
Use a Client Approval Board When
- A brand is paying for the project
- Product presentation must follow guidelines
- Specific claims or text must appear
- Several stakeholders need to review the direction
- Reshooting would affect the campaign deadline or budget
The better option is the simplest board that protects the production.
More panels and polished drawings do not automatically produce a better video.
Add Timing, Framing, Movement, Audio, and Text
A row of images is not enough when the team must execute the plan.
Add only the technical information that affects filming, approval, or editing.
Timing
Assign an estimated duration to every panel.
For a 15-second video, the total may look like:
- Hook: 2 seconds
- Problem: 3 seconds
- Product introduction: 2 seconds
- Demonstration: 5 seconds
- Result and CTA: 3 seconds
Without timing, a short script can turn into a 25-second edit that feels rushed.
Framing and Movement
Use simple terms:
- Wide shot
- Medium shot
- Close-up
- Top-down view
- Static camera
- Slow push-in
- Handheld movement
- Product rotation
Do not turn the storyboard into a complete camera manual.
The production team can adjust minor technical details on set.
Audio
Match each frame to:
- Spoken dialogue
- Voice-over
- Music change
- Sound effect
- Natural sound
- Silence
Audio planning matters when a visual action must match a word, beat, or transition.
On-Screen Text
Write the exact text when it affects:
- Product claims
- Price or offer
- Subtitle placement
- Branding
- Legal information
- Call to action
For vertical video, keep essential information away from platform interface areas.
Leave enough space for subtitles and avoid placing the product too close to the screen edges.
Transitions
Only plan transitions that support the idea.
A transition should have a purpose, such as:
- Showing a before-and-after change
- Moving between locations
- Revealing the product
- Compressing time
- Matching similar movements
A tricky transition doesn’t help the message.
It only leads to more filming and editing without improving the video.
Video Storyboard Example for a 15-Second Brand Marketing Video
The following is an illustrative production example, not a real client case study.
Scenario
A small Malaysian coffee brand needs a 15-second vertical video for Instagram Reels and TikTok.
Production limits:
- One creator
- One desk location
- Small production budget
- Product label must remain visible
- English and Malay text versions
- CTA directs viewers to the website or Shopee store
Short Brief
- Goal: Introduce the bottled coffee as a convenient afternoon drink
- Audience: Office workers and home-based creators
- Message: Cold coffee without leaving the workspace
- Format: 9:16 vertical video
- Duration: 15 seconds
- CTA: Order online
Approved Script
Afternoon energy without leaving your desk.
Open, pour, and get back to creating. Order online.
Visual Beat Breakdown
| Beat | Purpose |
|---|---|
| Creator looks tired at desk | Show the problem |
| Bottle enters frame | Introduce the product |
| Cap opens and coffee is poured | Demonstrate use |
| Creator takes a sip and returns to work | Show the outcome |
| Bottle and CTA remain on screen | Direct the next action |
Six-Panel Storyboard
| Panel | Time | Visual and Action | Audio and Text | Production Note |
|---|---|---|---|---|
| 1 | 0–2 sec | Creator pauses at a dim desk and looks tired | Text: “Afternoon slump?” | Leave top area clear for text |
| 2 | 2–4 sec | Bottle slides into frame beside the keyboard | Voice-over begins | Label faces camera |
| 3 | 4–6 sec | Close-up of the cap opening | Bottle-opening sound | Capture one clean product close-up |
| 4 | 6–9 sec | Coffee is poured over ice | “Open, pour…” | Use side light to show the liquid |
| 5 | 9–12 sec | Creator takes a sip and resumes editing | “…and get back to creating.” | Screen content should not reveal private information |
| 6 | 12–15 sec | Bottle remains beside the finished work | CTA: “Order online” | Prepare English and Malay text versions |
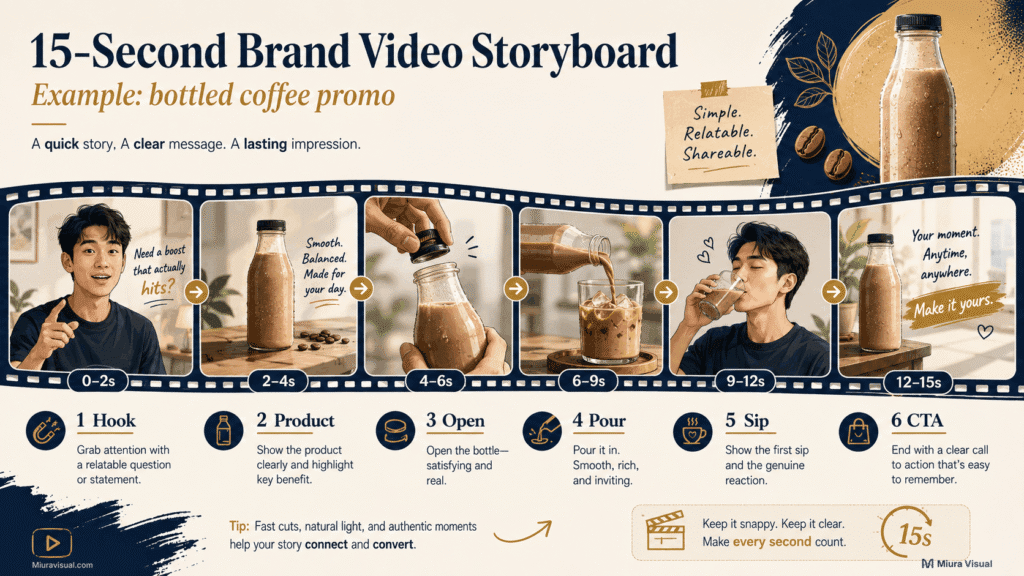
Why These Frames Work
Panel 1 establishes a clear problem without a long explanation.
Panels 2–4 show the product and its main use.
The bottle appears early enough that viewers understand what the video is about.
Panel 5 shows the product in a real-life situation. This approach avoids making unsupported claims about its performance.
Panel 6 gives viewers enough time to recognise the bottle and read the CTA.
A close-up of condensation can be nice to see.
But if it makes the video longer than 15 seconds without adding new info, it should go.
This is the type of judgement a useful storyboard should make before filming.
Review and Approve the Storyboard Before Production
“Send for feedback” is not a complete approval process.
The team should know:
- Who reviews the storyboard
- Who gives final approval
- What the client is approving
- What the production team still controls
- When changes stop
- How later changes will be handled
The Client or Brand Should Approve
- Core message
- Scene sequence
- Product appearance
- Mandatory visuals
- On-screen claims
- Brand-sensitive elements
- CTA
- Overall timing direction
The Production Team Should Control
- Exact lens choice
- Minor framing changes
- Technical lighting execution
- Additional coverage shots
- Safety decisions
- Practical adjustments required on set
Avoid giving five people equal final approval power.
Conflicting opinions can delay production and weaken the visual direction.
Use one clear approval status:
Draft → Internal Review → Client Review → Revision → Approved
Record:
- Version number
- Reviewer
- Approval date
- Remaining conditions
- Changes requested after approval
A requested change after approval may affect the schedule, budget, or required shots.
Make that trade-off visible before production begins.
Turn the Approved Storyboard Into a Shoot-Ready Shot List
A storyboard shows the video in viewing order.
A shot list organises what the crew must capture, often in the most efficient filming order.
For the bottled-coffee example, the storyboard sequence is:
Tired creator → Bottle reveal → Open bottle → Pour coffee → Drink and work → Product CTA
The shooting order may be:
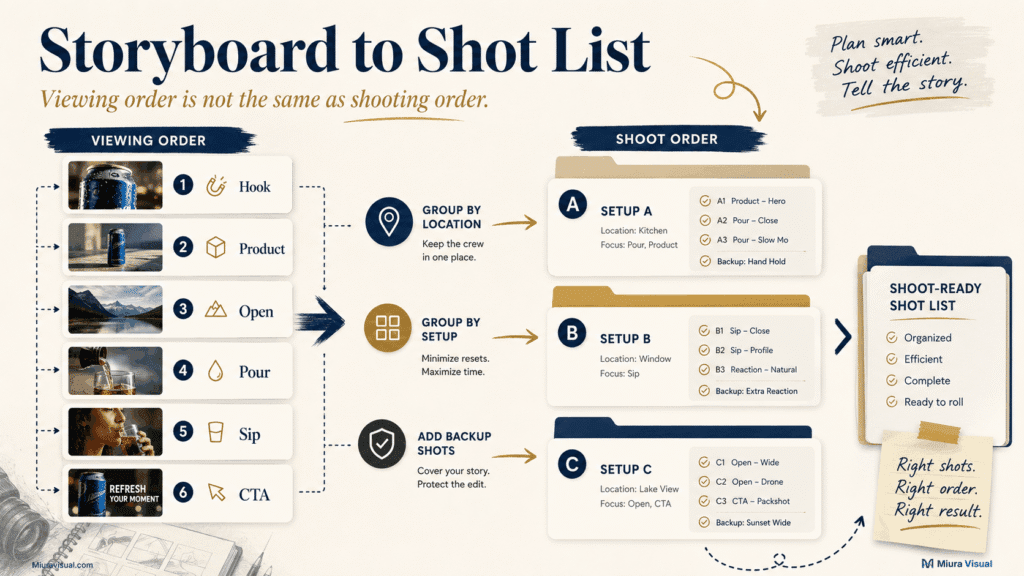
Desk Setup A
- Panel 1: Tired creator
- Panel 2: Bottle reveal
- Panel 5: Creator working
- Panel 6: Product CTA
Product Close-Up Setup
- Panel 3: Cap opening
- Panel 4: Coffee pouring
- Extra safety close-up of label
The final video keeps the original storyboard sequence.
The team records scenes to cut down on lighting changes, prop resets, and wasted time.
When converting the board:
- Give every required shot an ID.
- Group shots by location and setup.
- Group talent actions that use the same lighting.
- Add coverage and backup shots.
- Record orientation and delivery requirements.
- Check whether any storyboard panel lacks a filmable shot.
The detailed columns, coverage planning, and production use of a shot list belong in a separate shot list guide.
The storyboard should define the visual intention before that filming document is built.
Common Storyboarding Mistakes That Cause Reshoots
| Common Mistake | Production Consequence | Better Fix |
|---|---|---|
| Drawing every edit cut | The board becomes too long to review | Show meaningful visual changes |
| No purpose for each panel | Attractive shots add no message value | Assign one function to every frame |
| No timing | The planned sequence exceeds the runtime | Add seconds and calculate the total |
| Ignoring production limits | The team cannot recreate the visual | Check location, props, actions, and resources |
| No final approver | Major changes arrive after filming | Lock one approval gate |
| Treating the storyboard as a shot list | Filming order becomes inefficient | Reorganise shots after approval |
| Depending fully on AI visuals | Products, people, and continuity may be inaccurate | Use AI as reference and verify manually |
The biggest risk is approving a storyboard that looks great but can’t be filmed.
This might be due to issues with location, time, team, or budget.
Another common mistake is adding more footage as a safety measure.
Capture useful coverage. Don’t add extra material that slows down editing.
👉 For additional supporting visuals, plan only the B-roll the final sequence needs.
Paper, Canva, or AI: Which Tool Should You Use to Create a Storyboard?
Choose the lightest tool that supports the project.
| Method | Best For | Main Limitation |
|---|---|---|
| Paper or whiteboard | Fast solo planning | Harder to revise and share |
| Google Slides or Canva | Small teams and client approval | Manual file and version management |
| Storyboard software | Larger boards and collaboration | Additional cost and learning time |
| AI storyboard generator | Fast visual references | Accuracy and continuity risks |
Use Paper When
- You need to test the sequence quickly
- Nobody outside the room must approve it
- The idea may change several times
- Visual polish does not matter
Use Canva or Slides When
- A client must review the storyboard
- The team needs comments and revisions
- Brand assets must appear
- You need an exportable PDF
Use Dedicated Software When
- The board has many scenes
- Several collaborators need access
- Versions and comments are difficult to manage manually
- Animatics or detailed production notes are required
Use AI Carefully
AI can help generate:
- Rough location references
- Composition ideas
- Lighting directions
- Product scene concepts
- Visual mood options
AI could change the product, wardrobe, location, subject appearance, or how panels connect.
Mark AI panels as visual reference only. Check the final frame for accuracy and practical shootability first.
Conclusion: Decide First, Then Draw Only What You Need
Create a storyboard when the video depends on a controlled visual sequence, expensive reshoots, strict timing, product actions, team coordination, or client approval.
Skip the storyboard when a simple outline and shot list can guide a low-risk talking-head, casual vlog, or spontaneous recording.
Wait when the goal, script, platform, duration, or CTA is still changing.
Next, take one approved script. Mark its key visual changes. Then, create a minimum of six panels for the storyboard.
After the sequence gets approved, add it to the video production workflow and get ready for the shoot.
Frequently Asked Questions
How many storyboard panels does a 30-second video need?
There is no fixed number. Use one panel for each meaningful visual change, not every sentence or editing cut. A simple 30-second brand video may only need 6–12 key panels.
Do I need drawing skills to storyboard a video?
No. Stick figures, simple shapes, reference images, screenshots, and rough sketches work well. They clearly show the framing, action, timing, and text.
Can I create a storyboard in Canva?
Yes. Canva or Google Slides works well for small teams and client approval. Include visual panels, timing, actions, audio, on-screen text, production notes, and approval status.
Can AI create a video storyboard?
AI can quickly create visual references. However, a person must check for accuracy. This covers product details, character consistency, locations, branding, and if each panel can be filmed.
Should event videos use storyboards?
Usually not for unpredictable live coverage. An event video often benefits more from a schedule, priority shot list, interview plan, and key-moment checklist. Storyboard just the controlled parts, like the opening sequence, sponsor message, or planned promo scene.

Miura Visual
Transforming visuals into content, stories, and scalable value across platforms and audiences.
Related Article