How Should You Build a Content Creator Lighting Setup?
A good content creator lighting setup does not start with buying more lights. It starts by identifying what looks wrong, adjusting the light you already have, and adding equipment only when it solves a specific problem.
Quick Answer: Start With One Light You Can Control
For most creator setups, begin with one controllable light source.
Focus on these five things:
Direction > Softness > Distance > Ambient light > Colour consistency
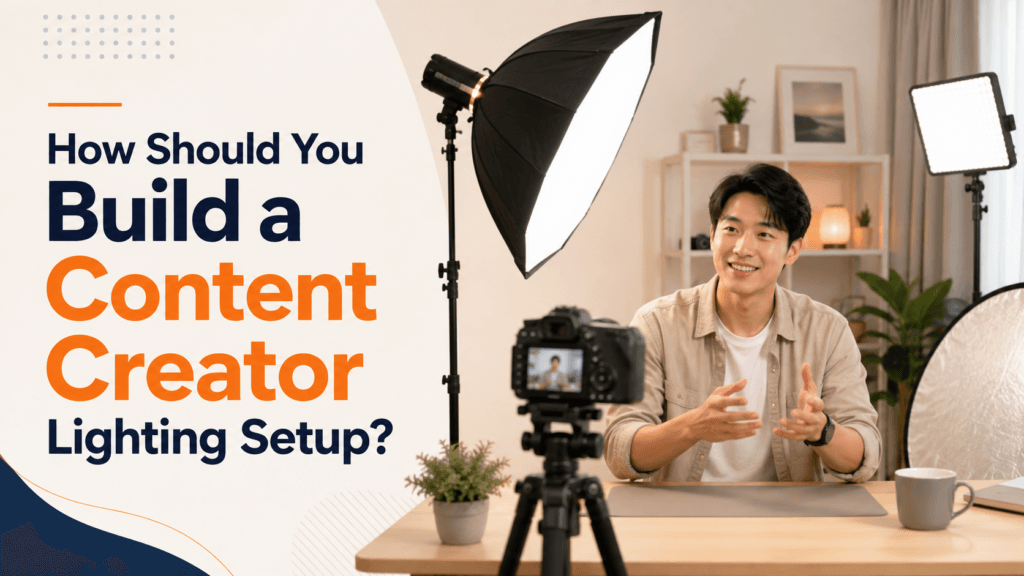
A softbox is our go-to for many photo and video setups.
It helps us control direction and modifiers better.
A reflector can often lift the darker side without adding another powered light.
Add a second or third light only when the first light can’t do a job you need.
This includes tasks like background control, stronger fill, or subject separation.
The practical rule is simple:
Fix the visible problem before adding more gear.
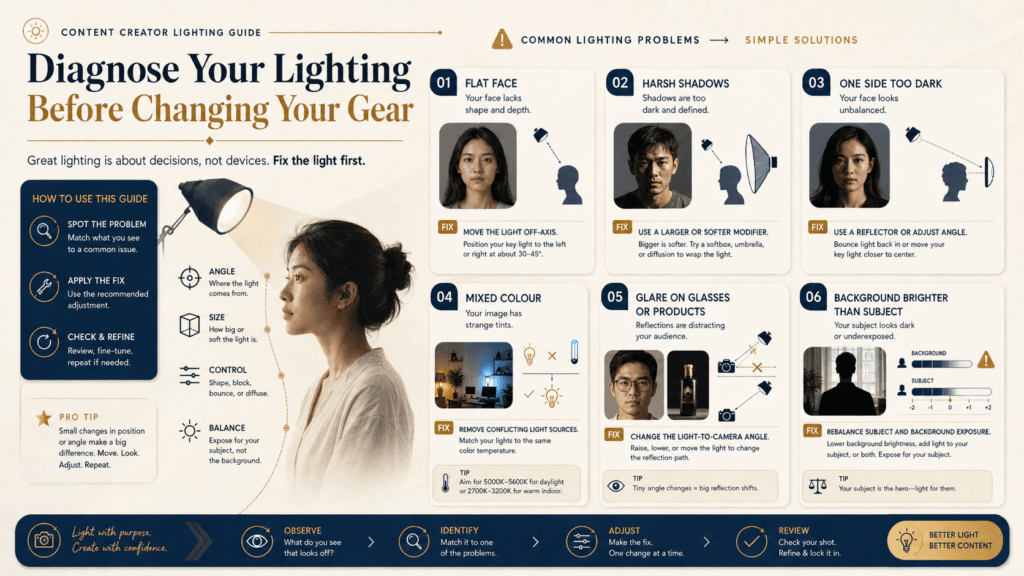
Diagnose Your Lighting Before Changing Your Gear
When a photo or video looks off, don’t rush to boost brightness or add more light.
First identify what the problem actually looks like.
| What You See | What to Check First | First Adjustment |
|---|---|---|
| Face looks flat | Light direction | Move the key light away from the camera axis |
| Shadows look too harsh | Source size and diffusion | Use a larger or softer modifier |
| One side is too dark | Light angle and contrast | Adjust the key or add a reflector |
| Skin looks orange and background looks blue | Mixed light sources | Reduce or match different colour temperatures |
| Glasses or products have strong glare | Light-to-camera angle | Move the light or subject before changing power |
| Subject looks lost in the background | Separation and exposure | Reposition the key or control the background |
| Background is brighter than the subject | Exposure balance | Reduce background light or increase subject control |
The important part is the order.
For example, if a face appears flat with a softbox next to the camera, a brighter light may not help.
The more useful first move is usually changing the direction of the existing light.
The same applies to hard shadows.
More brightness does not turn hard light into soft light.
First, consider diffusion.
Then, think about the light source and how far it is from the subject.
This diagnosis-first approach also keeps a small creator setup manageable.
You are fixing one variable at a time instead of creating three new variables with extra lights.
Start With the Smallest Lighting Setup That Works
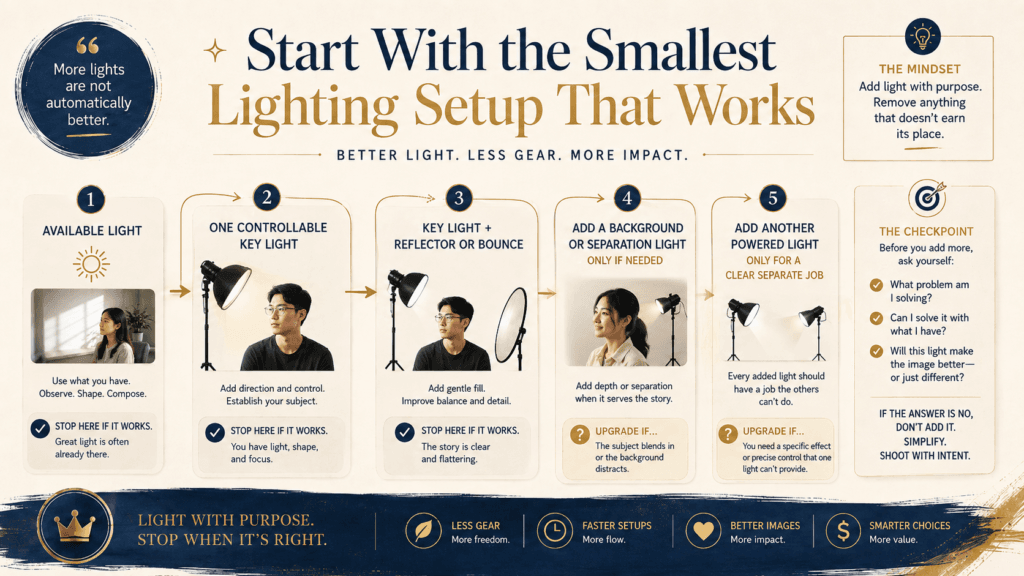
More lights give you more control, but they also give you more things to control.
We have used one-light and multi-light setups.
A simple setup is often the best starting point.
It can give the subject good shape, clean exposure, and consistent results.
A practical upgrade order looks like this:
- Use available light if it already gives you the direction and consistency you need.
- Add one controlled key light when available light is unreliable or poorly positioned.
- Add a reflector or bounce if the shadow side only needs a small lift.
- Add another powered light only when you need to control a separate part of the image.
- Use a more complex multi-light setup when each light has a clear purpose.
The stop condition matters.
If one softbox gives you a clean talking-head shot, you don’t need to add a fill and backlight.
A traditional three-point setup uses them, but it’s not a must.
For our own work, a controllable softbox can handle many different situations in our work.
Changing the angle, distance, or modifier can give us better variation.
It’s often more useful than just adding another light.
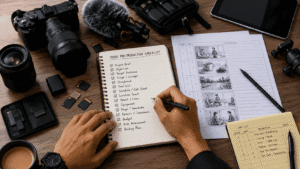
If you’re planning a full video shoot, look at this video pre-production checklist.
It covers more than just lighting. It also helps you review location, camera, audio, lighting, and backup needs all at once.
Natural Light vs Artificial Light: Choose Based on Control
Natural light can look excellent.
The problem is not quality; it is control.
A large window can act like a very useful soft source for a short creator session.
If the direction is good and the light remains stable, there may be no reason to replace it.
Artificial lighting becomes more useful when you need the same look repeatedly.
Choose natural light when:
- the window already gives you useful direction
- the session is short
- changing daylight will not create continuity problems
- you can move the subject to suit the light
- you want to keep the setup minimal
Choose artificial light when:
- you need consistent results across several takes or sessions
- the room has poor natural-light direction
- you shoot at different times of day
- you need precise control over the subject and background
- your content must match from one production day to another
There is also no rule saying you must use only one or the other.
You can use daylight as the main source and a reflector for gentle fill.
You can also control a room with artificial light while reducing unwanted daylight.
The decision must focus on repeatability and control.
It shouldn’t assume that natural or artificial light is always more professional.
Lighting Techniques for Content Creators: What We Actually Use
A lighting diagram only becomes useful when you understand what each position changes.
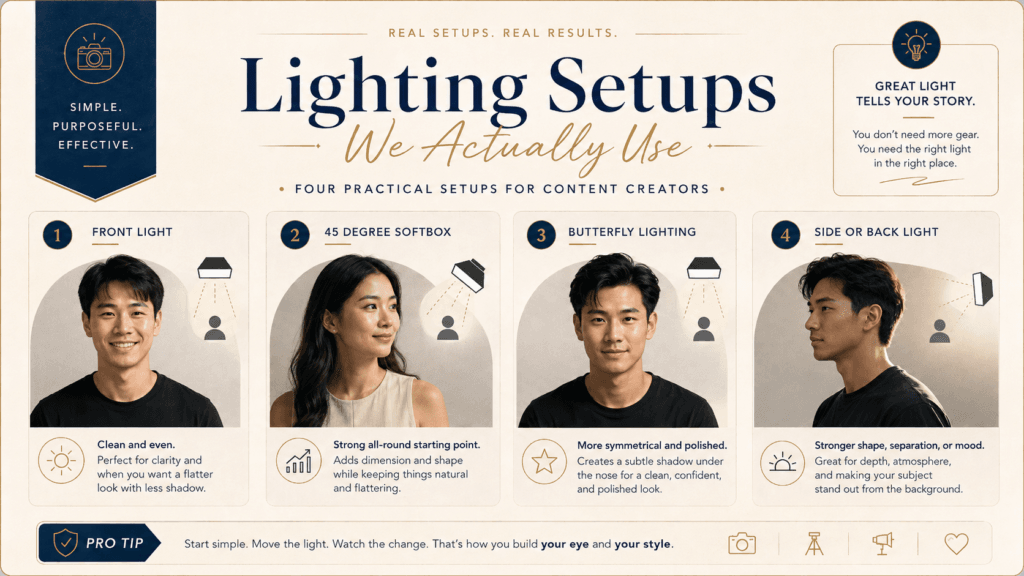
We used different lighting styles, including:
- Front lighting
- 45-degree lighting
- Side lighting
- Back or edge lighting
- Butterfly-style lighting
- Multi-light setups
The choice depends on what the subject needs, not on which pattern sounds more advanced.
Softbox Around 45 Degrees: A Strong Starting Point
To create a more visible shape, move the softbox away from the camera.
Position it at about 45 degrees to the subject instead of straight on.
One side receives stronger illumination while the opposite side keeps some controlled shadow.
That balance between highlights and shadows helps create depth without making the setup difficult to manage.
For talking-head video content, portraits, and many creator setups, we would start here.
The exact angle does not need to be mathematically perfect. Watch the face, not the number.
Move the light until:
- the brighter side still keeps detail
- the shadow side does not become distracting
- the eyes remain clear
- the face has enough shape for the intended look
Then decide whether you actually need fill.
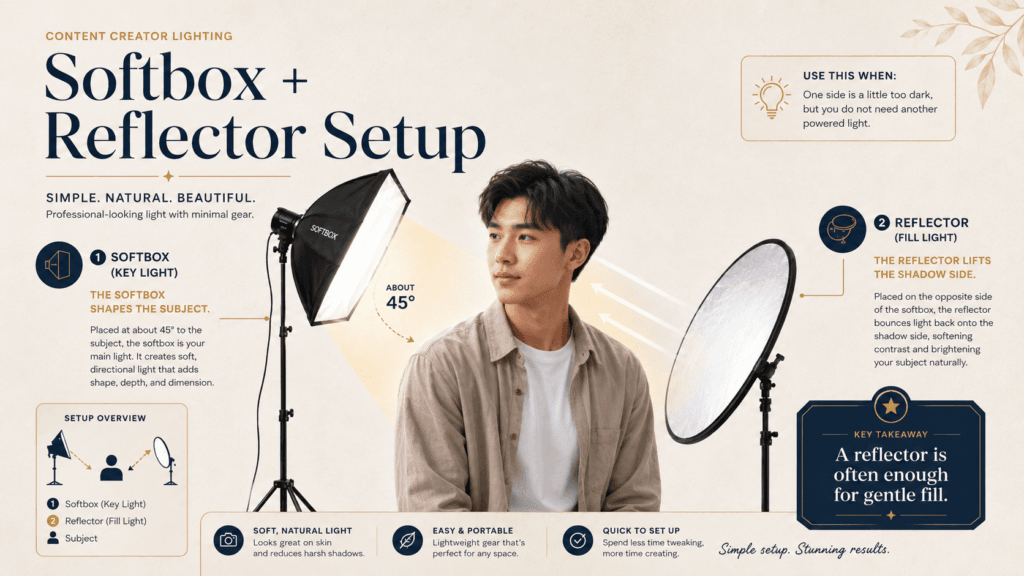
Softbox + Reflector: Fill Without Another Powered Light
A reflector works well as fill light when the key light is already doing its job but the darker side needs a little more detail.
We use reflectors for exactly this reason.
If you just need a gentle lift, adding another powered light can waste time.
It also adds more intensity or color options to handle.
Move the reflector closer for stronger fill and farther away for less.
The goal is not necessarily to remove every shadow.
Some shadow is what gives the subject shape.
Front and Butterfly Lighting: Cleaner, More Symmetrical Results
Front lighting reduces directional shadow and can produce a cleaner, flatter result.
Butterfly lighting places the main light higher and more centered.
This creates a small shadow under the nose and keeps the face looking symmetrical.
We have used this style when a cleaner portrait or beauty-oriented look suits the subject.
That does not make butterfly lighting “better” than a 45-degree setup.
Use it when symmetry and frontal presentation matter more than strong side-to-side modelling.
Side and Back Lighting: Use Them for a Reason
Side lighting increases contrast and can make texture or shape more obvious.
Back or edge lighting helps make a subject stand out from the background.
It also creates a stronger outline.
We’ve also employed multi-light setups.
This allows us to manage the subject, background, and separation independently.
This is where extra lights become worthwhile.
A second light has a clear purpose when you can say something like:
The key light is already correct, but the dark subject is blending into the dark background.
Now a separation light has a job.
“Three lights look more professional” is not a job.
LED Panels: Useful When Space or Flexibility Matters
LED lights are great for fill and background lighting.
They work well in smaller setups where big modifiers are not practical.
We use LED panels with softboxes and reflectors.
They are not a replacement for all other light sources.
If the panel’s light is too harsh for the subject, don’t ask if you need a stronger panel first.
Check whether you can add a diffuser, bounce the light or reposition it instead.
Ring Light vs Softbox: Choose for the Job, Not Popularity
A ring light and a softbox both light up a content creator, but they need different setups.
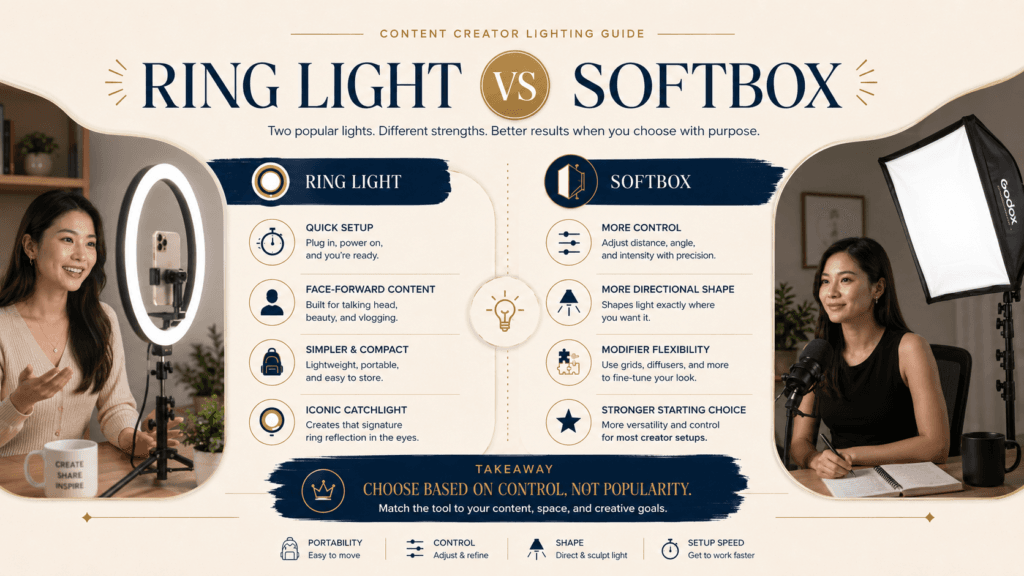
| Situation | Practical Starting Choice |
|---|---|
| Fast face-forward content | Ring light can be convenient |
| More directional shaping | Softbox |
| Modifier flexibility | Softbox |
| Very simple camera-centred setup | Ring light |
| Portrait-style lighting control | Softbox |
| Product texture and directional detail | Softbox |
| Fixed creator space with room for a modifier | Softbox |
For Miura Visual, softbox is our preferred starting tool.
We can change the modifier, position, distance, and direction.
This helps us create different looks from the same basic source.
That flexibility matters more to us than having the fastest possible setup.
A single softbox is enough for many creator, portrait, and general content needs.
You might need another powered light later, but it covers a lot initially.
A ring light is useful when you need speed, portability, and simple face lighting over shaping.
Do not choose based on which light appears more often in creator setups.
Choose based on how much control you actually need.
Make Your Content Creator Lighting Setup Repeatable
Getting one good frame is useful. Being able to recreate it next week is more valuable.
This becomes especially important when you produce a series of videos, staff portraits, product content or recurring brand visuals.
Our photography workflow handles exposure, white balance, and lighting direction.
These elements help us stay consistent during a shoot.
You can apply the same thinking to a regular content setup.
Create a simple lighting record for setups you want to reuse.
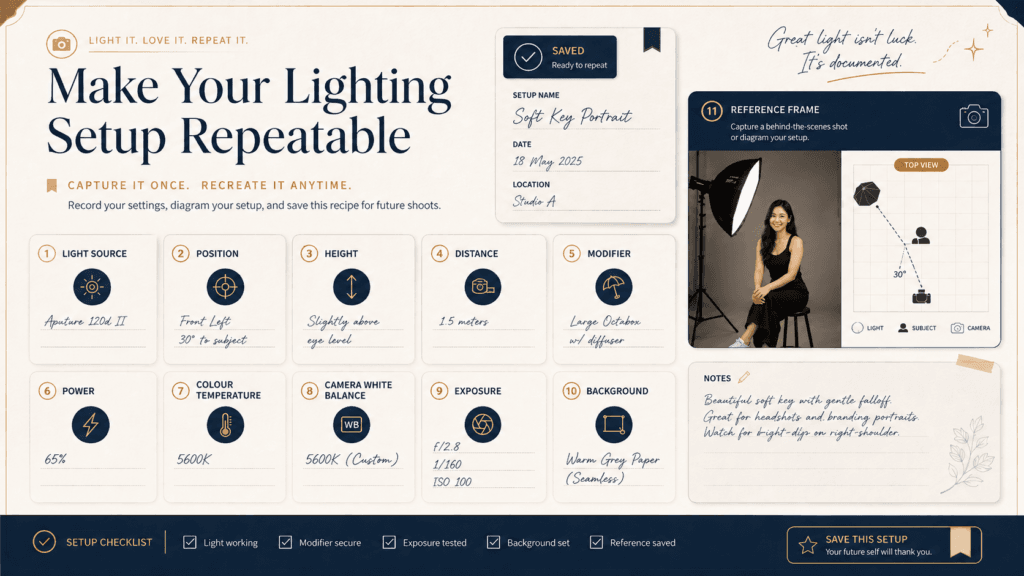
Lighting Setup Record
Record:
- Light source: softbox, LED panel, window or other source
- Position: front, 45 degrees, side, back
- Height: relative to the subject
- Distance: approximate light-to-subject distance
- Modifier: diffusion, grid, reflector or other modifier
- Power: if your light provides a repeatable power setting
- Colour temperature: when adjustable
- Camera white balance
- Exposure settings
- Background position
- Reference frame
You do not need studio floor plans for everyday content.
A smartphone photo of the setup plus a few settings is often enough to remind you where everything was.
This is particularly useful for a small team.
Someone else can look at the record.
They should be able to recreate the old setup without using memory.
 For video projects with more stages after filming, keep the lighting record.
This will serve as a reference in your wider video production workflow.
When More Lighting Will Not Fix the Problem
Buying another light is a weak solution when the existing problem is not caused by a lack of light.
Before adding equipment, check these common situations.
The Light Is in the Wrong Place
If the subject looks flat or the reflection is distracting, reposition first.
A second light does not correct the poor placement of the first one.
The Sources Have Different Colours
A daylight source, warm ceiling light, and adjustable LED can mix colors in the same scene.
Adding another light may make the problem worse.
First, control or remove any extra light sources.
Then, set the white balance for your current lighting.
The Room Is Too Small for the Setup
A large modifier can be useful, but only if you can place it correctly.
In a small room, cramming a three-light setup into corners can create problems.
It can lead to awkward angles and unwanted light spill.
You might also see extra light stands in the shot.
A simpler one-light setup may give you better control.
The Background Is the Real Problem
Sometimes the subject lighting is already fine.
If the frame appears weak due to a bright or distracting background, adjust the background exposure.
You can also change the subject’s position or create more separation.
Avoid just increasing the key-light power.
You Are Trying to Remove Every Shadow
Shadow is not automatically a mistake.
Hard, poorly positioned or distracting shadows may need correction.
Controlled shadows help create form.
Adding fill to match brightness on every surface can make the image flatter, not better.
A useful rule is: Every additional light should have one named job.
If you cannot explain what problem the new light is solving, skip it for now.
Conclusion: Build the Setup Around the Problem
If you already have a softbox, LED panel or good window light, start there.
Adjust direction, softness, and distance. Take a test frame.
Only add a reflector or another light if the current setup can’t solve the issue.
Creators with a simple, repeatable one-light setup don’t need to upgrade just because a more complex lighting diagram is available.
If your current setup is inconsistent, fix and record it first.
The most practical next step is to change one variable, compare the result, and save the setup once it works.
Frequently Asked Questions
What is a good light for content creation?
A diffused, controllable light is a practical starting point. We prefer softboxes for many creator setups. They let you shape light by changing position, distance, and modifiers. But a good window or LED setup can work too, as long as it gives you enough control.
Do content creators need three-point lighting?
No. Three-point lighting helps you control the key, fill, and subject separation. However, many creator videos can be made with just a good key light and a reflector if needed.
Add more lights when each one solves a specific visual problem.
Can one softbox be enough for both photos and videos?
Yes, for many controlled creator setups. We often see a softbox as a great starting tool. You can easily reposition or modify it for various looks.
A second light is helpful when you want to control a different part of the frame. This could be the background or edge separation.
Should I turn off normal room lights when filming?
If the room lights create unwanted colors, turn them off. This helps reduce harsh shadows and uneven exposure. You’ll have better control over the scene.
Keep them if they add to the overall look and blend well with the lighting.

Miura Visual
Transforming visuals into content, stories, and scalable value across platforms and audiences.
Related Article